Showing posts with label circuit. Show all posts

Friday, December 12, 2014

Broadcast Transmitter Circuit Diagram

transmitter-schematic


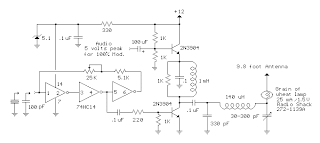
In this circuit, a 74HC14 hex Schmitt trigger inverter is used as a square wave oscillator to drive a small signal transistor in a class C amplifier configuration.The oscillator frequency can be either fixed by a crystal or made adjustable (VFO) with a capacitor/resistor combination.
Read More..

Intercom Circuit with Transistors

intercom-diy-project

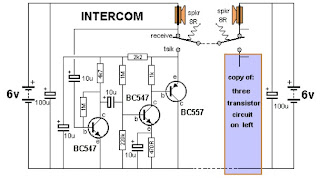
This is a 2-station simple intercom circuit build based on transistors part and using common 8R mini speakers. The speaker works as microphone and generate sound, so there is no need microphone for this intercom. The "press-to-talk" switches should have a spring-return so the intercom can never be left ON, push on switch can be used for this kind of task. 
Read More..

Voltage inverter circuit


This voltage inverter circuit powering a dual supply op amp from a single battery problem. The circuit simply takes a positive voltage and inverts it. It uses only one 555 timer and a few other passive components, so it doesn't add much in the way of size and cost to a project. 
Read More..

Thursday, December 11, 2014

Voltage Inverter Circuit


This simple and inexpensive circuit can produce a dual (positive and negative) voltage from a single supply input.
It is therefore extremely useful for powering opamp and other circuits that require a dual voltage from a single battery.
Read More..

Thursday, November 20, 2014

Tone Control Circuit

3 Band Tone Control circuit uses an op-amp as an amplifier end. Tone Control circuit is a regulator of tone bass, midrange and treble or 3 band called because it can set the three tones. Filter circuit is applied to the series of "Tone Control 3 band" This type baxandal like the title of this article. 

Results filtering regulator tone or tone control baxandal type is good, because there is no signal level is wasted directly into the ground. Range frequency tones generated from Tone Control 3 band was determined by the configuration of the R and C of the filter section baxandal. As an amplifier on Tone Control The set of three band use traditional IC LF351 has slewrate high and high input impedance. For more details, series 3 Band Tone Control as follows.


Figure Series 3 Band Tone Control


3


3 Band Tone Control circuit above using LF351 Op-Amp is used to strengthen the signal after filtering by the filter process baxandal. Level tone Bass, Midrange and Treble settings are determined by potensio R1, R2 and R3. Frequency filter in the circuit above baxandal to 50 Hz bass tone, tone Midrange 1 KHz and 10 KHz for Treble tone.
Read More..

Wednesday, November 19, 2014

1000Watt Audio Power Amplifier Blazer Circuit

1000Watt Audio Power Amplifier Blazer Circuit

This is a audio power amplifier Blazer circuit provides up to 1000Watt . This fascinating routes several sensible bass and treble alive. Importantly ought to opt for Power offer supply, that has been fairly high voltage category 70Vdc GND -70V 10A is that the current low level.

The transistors are 2SC3858 (NPN) and 2SA1494 (PNP), and have high bandwidth, wonderful safe operating space, high linearity and high gain. Driver transistors are 2SC5200 (NPN) and 2SA1943 (PNP). All devices are rated at 230V, with the facility transistors having a 150W dissipation and also the drivers are 50W.

This circuit describes an amplifier, power offer and tests procedures that are all inherently dangerous. Nothing described during this article ought to even be thought-about unless youre totally experienced, grasp specifically what youre doing, and are willing to require full 100% responsibility for what you are doing. There are aspects of the look which will need analysis, fault-finding and/or modification.
Read More..

Tuesday, November 18, 2014

Analog Versatile Circuit MIC 640 Acquisition System

This tour, available in Stainless DIL 8 legs, can measure 4 analog voltage independent between 0 and 5 volts, and send the result of this measure in the form of four characters on a standard asynchronous serial link. Its serial output is directly TTL or CMOS compatible and can be connected to a serial input RS 232 by simply adding a resistor.

The MIC 640 can operate in automatic mode, thus sending the result of four steps every second, or in command mode, in which case it sends the result of four measures under the control of external logic signal. In this latter method that we use here.

Its consumption is extremely low, it is possible to feed signals from the unused serial port RS 232, subject of course not to waste the little energy available in external circuits involved too greedy.

This circuit, easily available in France, costs less than 18 euro which makes it an ideal candidate for this achievement we will find the schema without tarder.Si you want more information about the MIC 640;s complete data sheet entirely in French, is available for download by clicking this link.

Schematic acquisition module

AnalogAnalog Versatile Circuit MIC 640 Acquisition System

The heart of the module is obviously the MIC 640, spotted IC1 on the figure below. It is directly connected to the serial input RS 232 PC via limiting resistor R1 current.

His entry called CTRL to define its mode of operation. Left to the body, it makes it automatically perform a conversion on each input per second, whereas if it is reduced to levels as high as in this case, it triggers a conversion of each entry at each grounding.

These earthed take place through the transistor Q1 controlled by the serial data output TXD of RS 232, via the diode D4. This same output is through the diode D3 and this time the capacitor C3, to produce the negative supply voltage of the input stage that we discover in a moment.

The control lines DTR and RTS serial interface they provide for the positive supply via diodes D1 and D2. This voltage is unregulated, is the positive power of the input stage. By cons, it is regulated to 5 volts through IC2 so that it feeds a voltage very stable MIC 640.

As the current and available for both the positive supply for the negative supply is still low (10 mA max), I had to carefully choose the components used and they will not be replaced under any pretext. IC2 is indeed a regulator 5 volts 3 feet very low: in one case in 2936 SM Z5 which absorbs only 500 uA. For information, its "equivalent" the 78L05 consumes 3 mA in the same situation!

The input stage meanwhile was achieved using four operational amplifiers effect transistor field-mounted voltage followers. This confers to the module input impedance greater than 100 MW. All four amplifiers are combined in one box, referenced LF 444 at National Semiconductor, whose total consumption does not exceed 800 uA for the four amplifiers! Again, no question of putting such a TL 084 which face voracious with its 5.6 mA!

This input stage is protected from excessive voltages through resistors R7 to R10 and diodes D6 to D13. If you precede the various stages of converting physical quantities / voltage, you can possibly do without protection diodes that degrade somewhat the very high input impedance of 444 MQ due to their leakage current. It is in fact only 50 pA maximum input of 444 LF while a diode, even small leaks, easily misses 1 nA or 20 times more!
Read More..

Sunday, November 16, 2014

TDA2006 12W Audio Amplifier Circuit

This 12w amplifier circuit is build round the TDA2006 integrated circuit who options a brief circuit protection system, and a thermal shutdown system in case of overheating. With a 12v power supply the circuit delivers 12w on a 4 ohm speaker and 8w on a 8 ohm speaker. The integrated circuit will work with a power supplyr between 6v and 15v max.

The TDA2006 is monolithic integrated circuit in package, {supposed to be used as a low frequency category "AB" amplifier. At ±12V, d = 10 and frequently it provides 12W output power on a 4Ω load and 8W on a 8Ω . The TDA2006 provides high output current and has terribly low harmonic and cross-over distortion. any the device incorporates an inspired (and patented) short circuit protection system comprising a rendezvous for automatically limiting the dissipated power therefore on keep the operating urpose of the output transistors at intervals their safe operating space. a standard thermal shutdown system is additionally included. The TDA2006 is pin to pin equivalent to the TDA2030
Read More..

Saturday, November 15, 2014

2×5 W STEREO POWER AMPLIFIER CIRCUIT BASED ON BA5417

BA5417 Stereo Power Amplifier

BA5417 is a stereo amplifier IC with a lot of good features like thermal shut down, standby function, soft clipping, wide operating voltage range etc. The IC can deliver 5W per channel into 4 ohm loud speakers at 12V DC supply voltage. The BA5417 has excellent sound quality and low THD (total harmonic distortion) around 0.1% at F=1kHz; Pout=0.5W.

Description

Setup and working of this stereo power amplifier circuit is somewhat similar to the BA5406 based stereo amplifier circuit published previously. C10 and C11 are DC decoupling capacitors which block any DC level present in the input signals. C2 and C6 couples the amplifiers left and right power outputs to the corresponding loud speakers. C1 and C5 are bootstrap capacitors. Bootstrapping is a method in which a portion of the amplifiers is taken and applied to the input. The prime objective of bootstrapping is to improve the input impedance. Networks R1,C3 and R2,C7 are meant for improving the high frequency stability of the circuit. C4 is the power supply filter capacitor. S1 is the standby switch. C8 is a filter capacitor. R3 and R4 sets the gain of the left and right channels of the amplifier in conjunction with the 39K internal feedback resistors.


Circuit Diagram


Notes

  • Supply voltage range of BA5417 is from 6 to 15V DC.
  • The recommended supply voltage for this circuit is 12V DC.
  • The power supply must be well regulated and filtered.
  • BA5417 requires a heatsink.
  • The circuit can be assembled on a perf board without much degradation in performance.
Read More..

Friday, November 14, 2014

METAL DETECTOR CIRCUIT

The device we then build will function as a metal detector that can scout out metal objects, such as coins, nails, keys such as car keys you may not be able to find, and even gold if youre looking for in a beach (though this one may not have industrial strength). This metal detector can detect certain kinds of metal- especially iron-containing metals, which are called ferrous metals, even if under a half-inch of drywall or sand.

How this metal detector works is that it uses an IC that generates an AC signal that goes through a coil. Metal objects are objects which conduct electricity, so a current can be induced in these metal objects. When the coil in the metal detector comes near a metal object, the electromagnetic field in the coil induces currents in the metal object. The electromagnetic field generated by the metal changes the current in the coil. When the signal changes, the IC turns on an LED i.e. alerting the user to the presence of a metal.

Circuit Diagram

Metal Detector Circuit
Parts Needed
  • TDA0161 Proximity Detector (IC1)
  • 2 1KΩ Resistors (R1, R4)
  • 10KΩ Potentiometer (R2)
  • 330Ω Resistor (R3)
  • 120Ω Resistor (R5)
  • 2N3904 Transistor (Q1)
  • 2 4.7nF ceramic capacitors (C1, C2)
  • 680 picohenry bobbin-type Inductor
  • Battery Holder for 4 AA batteries (6V)
  • LED
  • SPST Switch

Explanation of Circuit

Inductor L1 : The inductor L1 forms a parallel circuit with the capacitor C1 to form an LC parallel circuit. When a signal that oscillates at several KHz passes through this circuit, the signal creates an electric field around the coil. When you bring the coil near a metallic object, that electric field induces an oscillating signal in the object. So when the oscillating signal has been induced in the metallic object, the signal in the object creates an electric field that induces current in the coil. This current changes the oscillating signal running through the LC parallel circuit.

TDA0161 Proximity Detector IC : This IC is a proximity detector. This IC suplies the oscillating signal that is sent through the LC parallel circuit. The IC also responds to any changes in the signal. The IC has an output of 1 milliamperes (mA) or less if the coil is far from a metallic object and an output of 0mA or higher if the coil is near a metallic object. 
Thus, this IC is at the heart of this circuit. When the object is far from a metallic object, the current which the IC produces is insufficient to drive the LED. Thus, the LED does not turn on. When the coil is near a metallic object, the IC produces sufficient power to drive the LED and it turns on. 

Resistor R1 and Potentiometer R2 : These resistors are used to calibrate the TDA0161 IC to the LC circuit. You calibrate it by adjusting the potentiometer to change the current output it creates in accordance with the proximity of metal to the coil. You can adjust so that it can detect metals at the distances which you want it to. By increasing the potentiometer resistance, the IC will create less current output. Therefore, a metal must be placed closer to the coil in order for the LED to light. By decreasing the potentiometer resistance, the IC produces less current output, so the metal doesnt have to be placed as close to the coil. Its up to you to set the adjustment.

2N3904 Transistor (Q1) : The 2N3904 transistor provides amplification, so that there is sufficient current to power the LED. Without this transistor, there would not be enough power to turn on the LED. 

LED : The LED in the circuit serves as an indicator to when there is a presence of a metal. When a metal is in close proximity to our electronic circuitry, the LED turns on. This shows we have found metal. When the LED is off (not lit), then our metal detector has not detected metal and indicates no metal is in close proximity.

6 volts : The 6 volts is the supply power to the entire circuit. This 6 volts is supplied through 4 AA batteries in series. Being that each battery supplies 1.5 volts, 4 AA batteries (1.5V * 4) provides 6V. This 6 volts gives power to every component in the circuit.

SPST Switch : The SPST switch allows us to shut off power to the circuit, if we want the metal detector power shut off, just like any electronic device would have. This just serves asn an on/off switch.

This circuit detects metal through the coil, L1. Once metal is placed near the inductor L1, it will trigger current production from the proximity detector IC, which in turn lights the LED. So to test this circuit, just place a metallic object near this inductor. When done, the LED should turn on. When the metallic object is moved away, the LED should shut off. 
Read More..

Sunday, November 9, 2014

12 V Bidirectional Motor Control Circuit

This simple circuit drives DC motors with a maximum current of 1 A and can be built with readily available components.The output voltage is adjustable between 0 and 14 V and the polarity can be changed so that not only motor speed but also rotation direction can be adjusted by turning a knob. 

The circuit is also ideal as a controller for a DC model railway or small low voltage hobby tool. Power for the circuit is supplied by a 18 V mains transformer rated at 1.5 A. Diodes D1to D4 rectify the supply and capacitor C1 provides smoothing to give a DC output voltage of around 24 V. A classic ‘H’ bridge configuration is made up with transistors T1/T3 and T2/T4. Transistors T5 and T6 together with resistors R7 and R8 provide the current sense and limiting mechanism. The maximum output current limit can be changed from 1 A by using different value resistors for R7 and R8: IOUT = 0.6 V / R where R gives the value for R7 and R8. For increased current limit the mains transformer and diodes will need to be changed to cope with the extra current as well as the four transistors used in the bridge configuration. 

Circuit diagram:
  12 V Bidirectional Motor Control Circuit Diagram
 
Motor speed control and direction is controlled by a twin-ganged linear pot (P1). The two tracks of P1 together with R1/R2 and R3/R4 form two adjustable potential divider networks. Wiring to the track ends are reversed so that as the pot is turned the output voltage of one potential divider increases while the other decreases and vice versa. 

In the midway position both dividers are at the same voltage so there is no potential difference and the motor is stationary. As the pot is rotated the potential difference across the motor increases and it runs faster. The voltage drop across D5 and D6 is equal to the forward voltage drop VBE of the bridge transistors and ensures that the motor does not oscillate in the off position with the pot at its mid point.
Read More..

Friday, October 17, 2014

2N3055 and LM723 Power Supply 13 8Volt 10Amp circuit

My Friend want circuit power supply for VR.
I Find Website many, See to this Web http://www.rason.org
Good Site circuit.
This is circuit Power Supply 13.8 Volt 10 Amp by LM723 .
Detail ::

This circuit uses the LM723 IC which gives us excellent voltage regulation. The circuit uses 3 pass transistors which must be heat sinked. Resistor R9 allows the fine tuning of the voltage to exactly 13.8 volts and the resistor network formed by resistors R4 through R7 controls the current limiting. The LM723 limits the current when the voltage drop across R5 approaches .7 volts. To reduce costs, most commercial units rely on the HFE of the pass transistors to determine the current limiting. The fault in that system is that the HFE of the pass transistors actually increases when the transistors heat up and risks a thermal runaway condition causing a possible failure of the pass transistors. Because this circuit samples the collector current of the pass transistors, thermal runaway is not a problem in this circuit making it a much more reliable power supply. 
Read More..

Thursday, October 16, 2014

Motorcycle Alarm With Transistor Circuit Diagram

This is a simple Motorcycle Alarm With Transistor Circuit Diagram. Its designed to work at 12-volts. But - if you change the relay for one with a 6-volt coil - itll protect your "Classic Bike". The standby current is virtually zero - so it wont drain your battery.

Motorcycle Alarm With Transistor Circuit Diagram

Motorcycle

Any number of normally-open switches may be used. Fit the mercury switches so that they close when the steering is moved or when the bike is lifted off its side-stand or pushed forward off its centre-stand. Use micro-switches to protect removable panels and the lids of panniers etc. While at least one switch remains closed - the siren will sound.

About one minute after all of the switches have been opened again - the alarm will reset. How long it takes to switch off depends on the characteristics of the actual parts youve used. You can adjust the time to suit your requirements by changing the value of C1 and/or R3.

The circuit is designed to use an electronic Siren drawing 300 to 400mA. Its not usually a good idea to use the bikes own Horn because it can be easily located and disconnected. However, if you choose to use the Horn, remember that the alarm relay is too small to carry the necessary current. Connect the coil of a suitably rated relay to the Siren output - and use its contacts to sound the horn.

The circuit board and switches must be protected from the elements. Dampness or condensation will cause malfunction. Without its terminal blocks, the board is small. Ideally, you should try to find a siren with enough spare space inside to accommodate it. Fit a 1-amp in-line fuse as close as possible to the power source. This is Very Important. The fuse is there to protect the wiring - not the circuit board. Instead of using a key-switch you can use a hidden switch; or you could use the normally-closed contacts of a small relay. Wire the relay coil so that its energized while the ignition is on. Then every time you turn the ignition off - the alarm will set itself.

When its not sounding, the circuit uses virtually no current. This should make it useful in other circumstances. For example, powered by dry batteries and with the relay and siren voltages to suit, it could be fitted inside a computer or anything else thats in danger of being picked up and carried away. The low standby current and automatic reset means that for this sort of application an external on/off switch may not be necessary.

When you set the alarm - if one of the switches is closed - the siren will sound. This could cause annoyance late at night. A small modification will allow you to Monitor The State Of The Switches using LEDs. When the LEDs are all off - the switches are all open - and its safe to turn the alarm on.

Veroboard Layout

Veroboard


Read More..

Simple 150W Amplifier Circuit Diagram

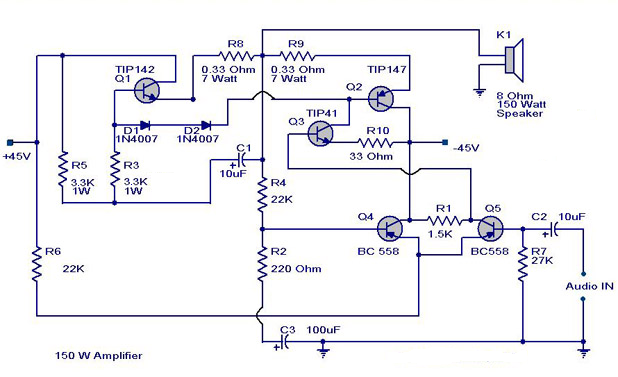
This is the cheapest 150 Watt amplifier circuit you can make,I think.Based on two Darlington power transistors TIP 142 and TIP 147 ,this circuit can deliver a blasting 150 W Rms to a 4 Ohm speaker.Enough for you to get rocked?;then try out this.

TIP 147 and 142 are complementary Darlington pair transistors which can handle 5 A current and 100V ,famous for their ruggedness. Here two BC 558 transistors Q5 and Q4 are wired as pre amplifier and TIP 142 ,TIP 147 together with TIP41  (Q1,Q2,Q3) is used for driving the speaker.This circuit is designed so rugged that this can be assembled even on a perf board or even by pin to pin soldering.The circuit can be powered from a +/-45V, 5A  dual power supply.You must try this circuit.Its working great!

The preamplifier section of this circuit is based around Q4 and Q5 which forms a differential amplifier. The use of a differential amplifier in the input stage reduces noise and also provides a means for applying negative feedback. Thus overall performance of the amplifier is improved. Input signal is applied to the base of Q5 through the DC decoupling capacitor C2. Feedback voltage is applied to the base of Q4 from the junction of 0.33 ohm resistors through the 22K resistor. A complementary Class AB push-pull stage is built around the transistors Q1 and Q2 for driving the loud speaker. Diodes D1 and D2 biases the complementary pair and ensures Class AB operation. Transistor Q3 drives the push-pull pair and its base is directly coupled to the collector of Q5.

 150W Amplifier Circuit Diagram

 150w amplifier circuit diagram

Notes.

  • Remember TIP 142 and 147 are Darlington pairs  .They are shown as conventional transistors in figure for ease.So don’t get confused.Even though each of them have 2 transistors ,2 resistors and 1 diode inside ,only three pins ,base emitter and collector are coming out.Rest are connected internally.So its quite OK to assume each of them as transistor for ease.
  • Use a well regulated and filtered power supply.
  • Connect a 10K POT in series with the input as volume control if you need.Not shown in circuit diagram.
  • All electrolytic capacitors must be rated at least 50volts.

Power supply for this circuit.

A  +40/-40 unregulated dual supply for powering this amplifier project is shown below.  This power supply is only enough for powering one channel and for stereo applications double the current ratings of  the transformer, diodes and fuses.


Read More..

Wednesday, October 15, 2014

Burglar Alarm With Timed Shutoff Circuit Diagram

When SI (sensor) is closed, power is applied to U2, a dual timer. After a time determined by C2, CI is energized after a predetermined time determined by the value of C5, pin 9 of U2 becomes low, switching off the transistor in the optoisolater, cutting anode current of SCR1 and de-energizing Kl. The system is now reset. Notice that (i6x C2) is less than (R7xC$). The ON time is approximately given by:(R7xC5)-(R6xC2) = Ton 


Burglar Alarm With Timed Shutoff Circuit Diagram


Read More..

Phase Controlled Dimmer Circuit Diagram

A phase-controlled dimmer delays the triac turn-on to a selected point in each successive ac half cycle. Use this circuit only for incandescent lamps, heaters, soldering irons, or universal motors that have brushes.

Phase Controlled Dimmer Circuit Diagram


Phase

Read More..

Monday, October 13, 2014

Latest new Oxygen Sensor Simulator Oxygen Simulator Sensor


The schematic diagram for the simulator. Closing the switch engages the simulator. Turning the knob clockwise simulates a lean condition, turns the LED off, and the car should start running rich to compensate. The big "V" is a digital voltmeter (not shown in the pictures). Using a smaller value for C1, perhaps 4.7 uF, will make the circuit oscillate faster and might be more like a real oxygen sensor (a new sensor switches more often than an old one).

The schematic diagram for the simulator. Closing the switch engages the simulator. Turning the knob clockwise simulates a lean condition, turns the LED off, and the car should start running rich to compensate. The big "V" is a digital voltmeter (not shown in the pictures). Using a smaller value for C1, perhaps 4.7 uF, will make the circuit oscillate faster and might be more like a real oxygen sensor (a new sensor switches more often than an old one).


The schematic diagram of the adapter cable and oxygen sensor. Note the heater is shown as a resistor, mine measured about 7 ohms.

 
Read More..

Power Monitor Circuit Diagram

Here is a simple non-contact AC power monitor for home appliances and laboratory equipment that should remain continuously switched-on. A fuse failure or power breakdown in the equipment going unnoticed may cause irreparable loss. The monitor sounds an alarm on detecting power failure to the equipment. The circuit is built around CMOS IC CD4011 utilising only a few components. NAND gates N1 and N2 of the IC are wired as an oscillator that drives a piezobuzzer directly. Resistors R2 and R3 and capacitor C2 are the oscillator components. The amplifier comprising transistors T1 and T2 disables the oscillator when mains power is available. In the standby mode, the base of T1 picks up 50Hz mains hum during the positive half cycles of AC and T1 conducts.

Non-Contact Power Monitor Circuit diagram:
   
Non-Contact Power Monitor circuit diagram
  
This provides base current to T2 and it also conducts, pulling the collector to ground potential. As the collectors of T1 and T2 are connected to pin 2 of NAND gate N1 of the oscillator, the oscillator gets disabled when the transistors conduct. Capacitor C1 prevents rise of the collector voltage of T2 again during the negative half cycles. When the power fails, the electrical field around the equipment’s wiring ceases and T1 and T2 turn off. Capacitor C1 starts charging via R1 and preset VR and when it gets sufficiently charged, the oscillator is enabled and the piezobuzzer produces a shrill tone. Resistor R1 protects T2 from short circuit if VR is adjusted to zero resistance.

The circuit can be easily assembled on a perforated/breadboard. Use a small plastic case to enclose the circuit and a telescopic antenna as aerial. A 9V battery can be used to power the circuit. Since the circuit draws only a few microamperes current in the standby mode, the battery will last several months. After assembling the circuit, take the aerial near the mains cable and adjust VR until the alarm stops to indicate the standby mode. The circuit can be placed on the equipment to be monitored close to the mains cable.
Read More..

Friday, October 10, 2014

FAN302HL bassed 5 volt switching power supply circuit project

FAN302HLFAN302HL

A very simple 5 volt switching power supply electronic circuit project can be designed using FAN302HL highly integrated PWM controller integrated circuit, that provides several features to enhance the performance of general flyback converters.
The constant-current control, of the FAN302HL proprietary topology enables simplified circuit designs without secondary feedback circuitry for battery charger applications.
This 5 volt switching power supply electronic circuit project accepts a wide range input voltage from 90 to 265 VAC and will provide a 5 volt regulated output at a maximum output current of 1.2 ampere .
A proprietary Burst-Mode function with low operation current minimizes standby power consumption.

The FAN302HL controller also provides several like protections : VDD Over-Voltage Protection (Auto-Restart) ,VS Over-Voltage Protection (Latch Mode) , Fixed Over-Temperature Protection .
The most difficult part that is require in this project is the transformer.
W1 is four winds; for each wind of turns, refer to table bellow. Add one insulating tape between the first and second layers.
W2 is wound two layers and uses triple-insulated wire: end of positive fly line is 3.5cm, layer end of negative fly line is 2.5cm.
W3 is spares winding in one layer.
W4 is wound in the core of the outermost layer and sparse winding.

Read More..

Thursday, October 9, 2014

Circuit measurements temperature by diode 1N4148

measurements temperature by diode 1N4148

temperature by diode 1N4148 and ic 741.
easy to make and use.
Out to Voltmeter.
*** Low cost too !

When I wants the circuit takes the temperature to are simple. I uses Diode 1N4148 be formed check the temperature. By when feed voltage change it. It is have current flow be stable. When the temperature that Diode, change make Voltage. At it modifies with VR1 and VR2 fine decorate for show that is correct most fining decorates. The important I uses the temperature certainly compare with accurate temple. By compare with reserve 0 the degree Celsius per 0 Volt. For the certainty advises that, should use Digital Voltage Meter. Show well almost forget the important point should. Give power supply Regulator high-quality , such as IC 7815 and IC 7915 etc. Try usable this circuit sees, regard good base of the circuit takes the temperature sir.

Read More..