Showing posts with label service. Show all posts
Showing posts with label service. Show all posts
Saturday, September 13, 2014
SANYO 19R30 LCD TV SERVICE MODE SOFTWARE UPGRADE
How to enter Service Mode _ Software Upgrade _ Power Supply [SMPS] & Back-light Schematics (Circuit Diagrams) _ SANYO 19R30 - 19" LCD TV [STR-Y6453]
.jpg)
* First press “INPUT” button, then in turn press “2 - 5 - 8 - 0” to access factory main menu.
* Press ▲/▼ to select item, then press ► to access.
* Press ▲/▼ to move upward or downward and select item.
* Press ◄/► to adjust.
* Press “MENU” to return to the previous Lcd.Software upgrade method
* Copy the provided “KU*.bin” file to USB device root category. Then change the file name to “ku19p.bin” or “KU19P.BIN”.
* Completely cut off the TV power by unplug the power cord from the power outlet. (Be sure to use buttons on the remote control or on the TV to completely discharge the TV after power off).
* Insert the USB device into the USB port. Keep holding any button (except POWER button) on the TV and then plug the power cord into the power outlet, after about 2-3s release the button, the software begins to upgrade automatically. Note that during upgrade the USB device cannot be removed and the TV cannot be power off.
* During the process operate according to hints provided on the Lcd. When complete, remove the USB device, unplug the power cord and then plug it again, then press POWER to turn on the TV.
* After software upgrade the TV must be performed initialization and ADC correction and white balance alignment again. Below are steps for initialization:
* Go to factory menu, select the third item “Feature & Adjust”.

Go to “Feature & Adjust” sub-menu, select “EEPROM Init” at the first line.
Press (RIGHT arrow button) to perform initialization. During the process the message “Please Wait” will be displayed. When complete, “OK” is displayed.

SMPS SCHEMATIC [CLICK ON THE PICTURES TO MAGNIFY]

BACK-LIGHT INVERTER


Tuesday, September 9, 2014
SHARP 32LE240M LC 32LE340M SERVICE MODE FACTORY SETTING HOTEL MODE
Factory setting
AC power is plug off after shipment setting is done.
CAUTION: Do not plug on again after shipment setting is done. If do, please re-do the shipment setting. Do not off with remote control.
[Do inspection for LC-32LE240M/340M (for Philippines) using NTSC signal.]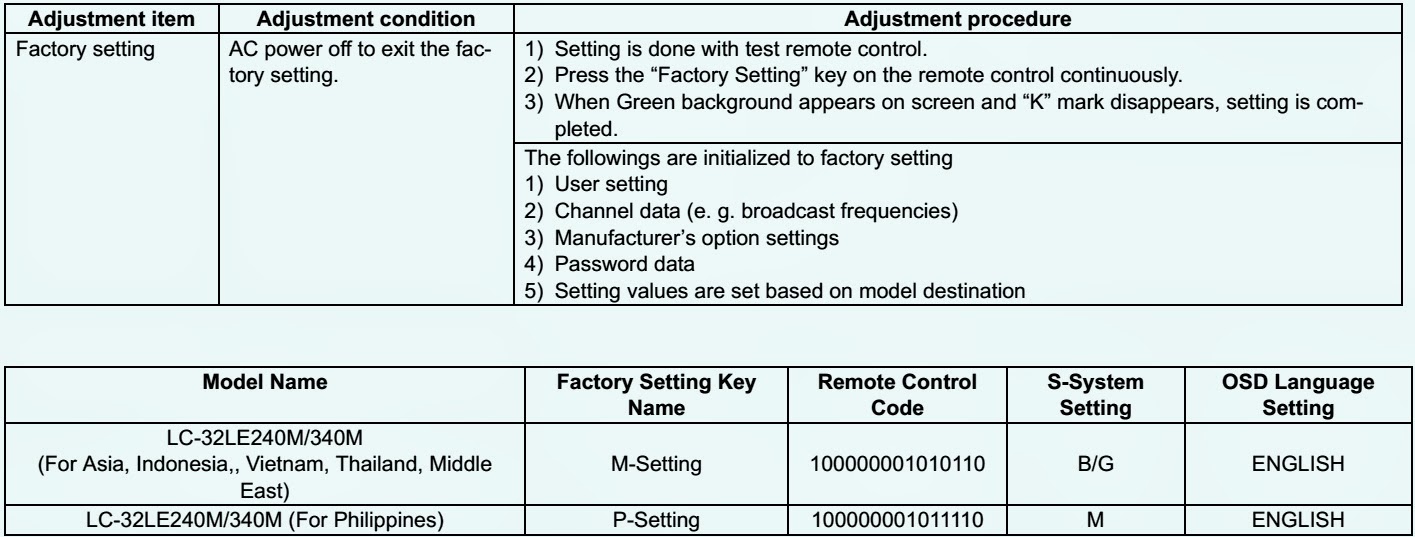
PUBLIC MODE SETTING PROCEDURE
There are the following two ways to get the public mode setup Lcd displayed.
1) Press the “INPUT” and “VOL (+)” keys on the set at once and turn on the power.
2) Get the password input Lcd displayed.
Procedure
* The input starts with the leftmost digit.
* Use the numeric keys [1] thru [9] and [10/0] keys on the remote controller.
The other keys are not acceptable.
With a numeric-key input, “–” will change to “*”. The input position will move one digit to the right.
With all the 3 digits entered, the password will be verified.3) The 3-digit password is now verified.
The password [0] [2] [7] provides for the public mode Lcd. (This Lcd comes on with whatever adjustment process settings.) With any other passwords, the Lcd changes to the normal mode.
Second Method
In the adjustment process mode, turn on “PUBLIC MODE”. Also press the “CH (^)” and “VOL (+)” keys on the set at once and turn on the power.
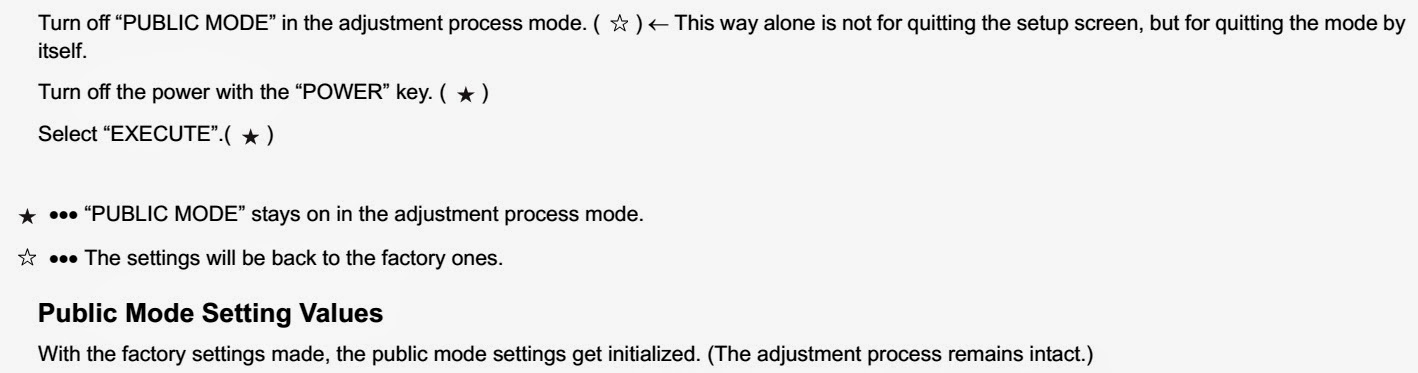
How to Exit Public Mode
There are the following ways to quit the public mode setup Lcd.
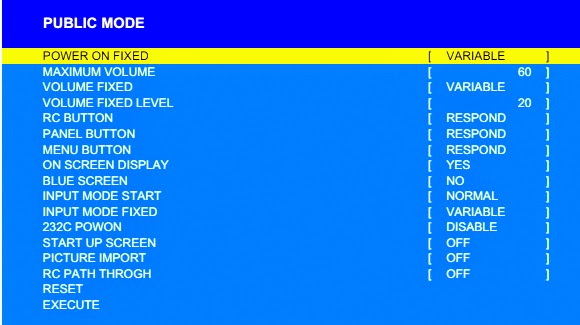
Public Mode Menu
The guidance is not displayed onLcd.
Setup procedure
* To move the cursor up and down, use the “cursor UP/DOWN” key (remote controller) and “CH ▲/▼ key (remote controller and set).
* To change the settings, use the “cursor RIGHT/LEFT” key (remote controller) and “VOL (+)/(–)” key (remote controller and set).
* To save new settings, keep the cursor at “Execute” and use the “cursor RIGHT/LEFT” key (remote controller) and “VOL (+)/(–)” key (remote controller and set).
To get the setting items details; go to >>
Subscribe to:
Posts (Atom)
